How to Tune a Tattoo Machine: 5 Tips for A Good Lining & Shading

Tuning a tattoo machine may not be as straightforward as it seems. This, of course, is more complex if you are a beginner.
How to tune a tattoo machine for lining or shading is entirely different depending on the gun – a FK Irons model will be less complex than a Dragonhawk one.
On top of that, it also requires specific skills and knowledge of the tattoo gun.
Every well-known specialist knows that. They cannot always use a tool out of the box, no matter how good the manufacturer says it already is.
The same is true for tattoo artists.
That is why, when starting, you need to learn the basics of tattoo machine tuning, so it is ready for your liking.
As you climb the professional ladder, you will find what works best for you.
Table of Contents
How to Tune a Tattoo Machine?
There are different techniques for drawing a tattoo. Two (2) techniques are common to all tattooing processes – lining and shading.

Lining, as the name implies, is the process of creating the outlines of the tattoo from the stencil on the skin.
Shading refers to adding more depth and color to the lines so that the tattoo comes out as intended.
These processes combine to give the right tattoo but require different machine tunings.
Tuning a Tattoo Machine For Lining
The lining is usually the first and the most delicate step in the tattoo process. Get this right, and your shading has a better chance of success.
The following suggestions are for a coiled setting.
Step I – preparation
– Make sure you have your blister pack needles, rubber bands, and tattoo machine tubes.
– Never handle the sterile parts of the tattoo machine without your latex gloves on.
– Designate a work area that is covered by a clean, disposable cloth for this operation.
Step II – pre-checks
– Bring the tattoo machine to eye level so that you can see the coils.
– Depress the armature bar. If the top of the front coil touches the bar before the rear coil touches the same bar, you are good to go.
– Otherwise, you need to get some coil shims (you can purchase them online or from a local tattoo shop) to adjust the situation.
– Note that both the front and rear coils must not simultaneously touch the armature bar.
– When it’s not moving, the front coil and the armature bar should be apart by about 1mm. You can use a dime as a handy measurement for this distance.

Step III – adjustments
– Adjusting the machine speed – lift the retaining bar on the contact screw to adjust the speed of the machine. This contact screw is found at the top back of the tattoo machine.
– For faster speeds, adjust the contact screw to the right. Make sure to stick with rates that you are comfortable with – and the speeds that ensure consistency in the work you are about to do.
– Return the retaining bar to place after adjusting the speed.
– For machines with volt speeds, aim around 6 volts for the best-balanced speed settings.
– The spring tension controls your needle stroke. Adjust it accordingly to make longer or shorter strokes.
– When lining, you should aim for short (but firm) strokes.
Step IV – needling
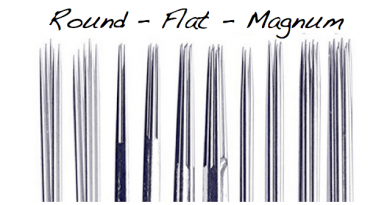
– The choice of tattoo needles for lining should be pointed, not flat. Flat needles will give your lining a thickness that might ruin the overall quality of your work, whereas pointed needles keep the work neat.
– Open the tube’s sleeve and place it in your work area.
– This is a sterile environment, so don’t forget to wear your rubber or latex gloves.
– Open the blister pack, choose the required needle, and bend slightly. The bend will ensure some tension when it snaps into place.
– Gently position the needle into the tube.
– The curve you made on the needle should point back towards the machine itself.
– A neat trick for increased tension is wrapping a rubber band around the needle arm and extending the rubber band to the back of the machine.
Step V – final adjustments
– Turn the machine on.
– Depending on the lining job, adjust your machine voltage to your preference (check this guide to learn about the tattoo machine power supply).
– As a guide, the heavier lining should be done at a higher speed than the lighter lining.
Tuning a Tattoo Machine For Shading
Shading brings out the details in your work. Done well, the colors will pop in all the right places, and your initial outlines from above don’t get smudged.
It would be best if you tuned your equipment correctly to achieve the best shading. Like in the previous section, this is for a coil configuration.
Step I – preparation
– Make sure you have your latex gloves on before handling any equipment.
– Ensure all tattoo instruments are clinically sterile before setting the machine up. This includes, but is not limited to, tattoo tubes, needles, needle bars, and grips. Please speak with your mentor (who we believe to be a licensed tattoo artist) on recommended sterilization equipment. Most artists use a combination of bleach and autoclave.
Only tattoo machines with the detachable motor feature can be autoclaved.
Step II – adjustment
– The thickness used for the lining above is not the same for shading. Here, set the distance between the armature bar and the contact screw to about 2mm.
Step III – needling
– Get a tattoo tube optimized for shading attached to the tattoo gun. You can use just about any tube, but you might not get the best work if you don’t use the specialized options.
– Insert the appropriate needle into the tube.
– Make sure the needle is secure in the tube.
– Adjust the needle tube and rubber band as you did with the lining machine setup above.

Step IV – speed settings
– Shading might take more space, but you need a slightly slower speed than used for the lining. Remember that you don’t have an outline to follow here, so you want to be as careful as possible.
– Like tuning a guitar, the best shading speed is determined by ear. When the buzz of the machine sounds deeper than what you used for lining, that is a good sign.
– Get into a shading speed that is comfortable and consistent.
Step V – How to tune a tattoo machine: final inspections and test
Do last checks on the tattoo gun itself to ensure it is in optimum working condition.
Lastly, it is a test run. Power it using all the voltage settings and feel how the machine behaves.
To learn about how to tune a rotary tattoo machine, check this guide: Rotary Tattoo Machines Guide.
How to Tune a Tattoo Machine is Half the Job
We always recommend getting a different machine for tuning and lining.
That way, you have two highly specialized pieces of equipment set to the best condition for both operations. Otherwise, it would help if you did the hard work of breaking apart and resetting the machines whenever you switch between functions.
Even if you use different machines for lining and shading, it never hurts to know how to tune a tattoo machine when the need arises.